Customizing Settings
Overview
Section titled “Overview”The MageIt World Markers plugin uses a highly flexible, two-tier configuration system.
To give you the perfect balance between consistency and flexibility, settings are divided into Global Settings (which apply to the whole game) and Local Settings (which apply only to a specific marker).
Understanding how to use both will help you keep your project organized as it scales.
🌍 1. Global Configuration (Project Settings)
Section titled “🌍 1. Global Configuration (Project Settings)”Global settings define the baseline behavior for your entire game. You should use these to establish consistent rules for interaction distances, UI layering, and performance budgets.
How to Access Global Settings
Section titled “How to Access Global Settings”- On the top menu bar of the Unreal Editor, click Edit.
- Select Project Settings.
- Scroll down the left-hand panel until you find the Plugins category.
- Click on World Marker Settings.
Key Global Settings
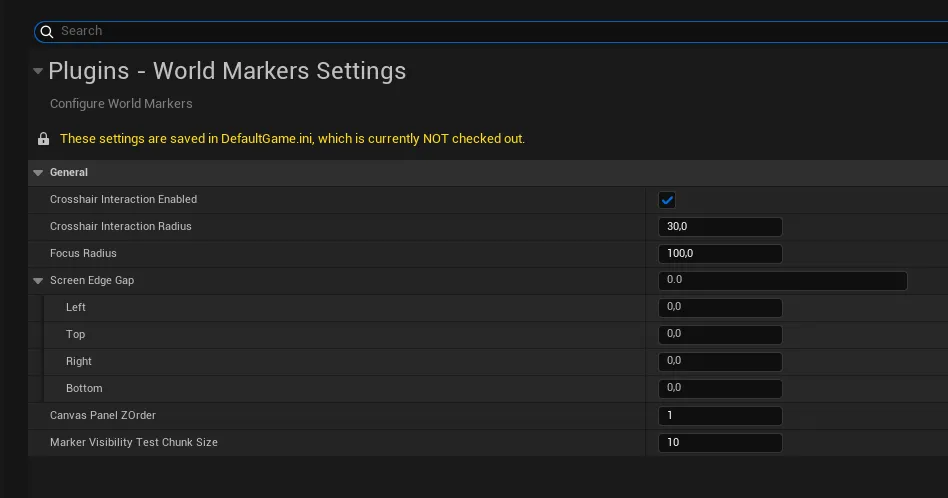
Section titled “Key Global Settings”- Crosshair Interaction Enabled: The master switch. If you turn this off, no markers in your game will react to the crosshair, regardless of their individual settings.
- Crosshair Interaction / Focus Radius: Defines the default screen-space radius (in UI units) for hover interactions. Setting this globally ensures all menus and interactive objects feel consistent to the player.
- Screen Edge Gap: The default padding applied to the edge of the monitor. Useful for ensuring your off-screen markers don’t overlap with static HUD elements like a minimap or health bar.
- Canvas Panel Z-Order: Defines what layer the markers render on. Increase this if your markers are rendering behind other UI widgets.
- Marker Visibility Test Chunk Size: A critical performance setting. Dictates how many markers are tested for visibility per frame. (Default: 10). Set this to 0 to turn off visibility checks and save some CPU time.
🎯 2. Local Configuration (Component Settings)
Section titled “🎯 2. Local Configuration (Component Settings)”While global settings provide a great baseline, games are full of exceptions. Bosses might need larger markers than standard enemies, and loot drops might need to be visible from further away than dialogue points.
This is where Local Component Settings come in.
How to Access Local Settings
Section titled “How to Access Local Settings”- Open the Blueprint of the Actor you want to modify (e.g.,
BP_EnemyBot). - Select the
MageIt World Markercomponent in the Components panel. - Look at the Details Panel on the right side of your screen.
Key Local Settings
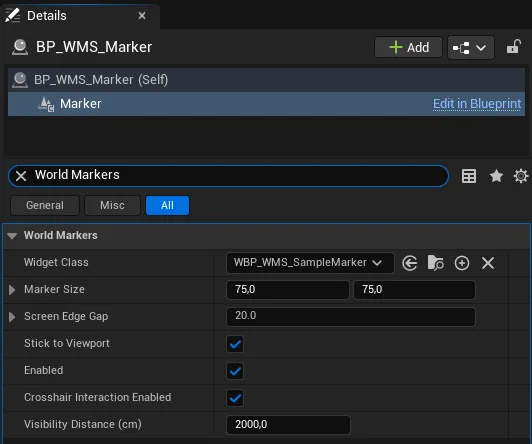
Section titled “Key Local Settings”- Widget Class: The specific UI Blueprint to spawn for this actor. You can have a red skull widget for enemies, and a yellow exclamation mark widget for quest givers.
- Marker Size (X/Y): Tells the math system how large this specific widget is. Adjust this if your custom widget is larger or smaller than the standard size so screen-edge clamping remains perfectly accurate.
- Max Visible Distance: By default, markers can be seen from infinitely far away. You can restrict this per-actor (e.g., standard loot markers disappear at 2,000 units, but legendary loot markers disappear at 10,000 units).
- Stick To Viewport: Choose whether this specific marker should clamp to the edge of the screen when the player looks away, or simply vanish.
- Crosshair Interaction Enabled: You can disable interaction on a per-marker basis. (e.g., An NPC marker reacts to the crosshair, but a generic background waypoint does not).
💡 Best Practices: Global vs. Local
Section titled “💡 Best Practices: Global vs. Local”Not sure where to change a setting? Use this rule of thumb:
- Use Project Settings for anything related to the player’s camera, screen size, performance, or baseline UI feel.
- Use Component Settings for anything related to the specific 3D object in the world (its visual representation, its importance, or its cull distance).